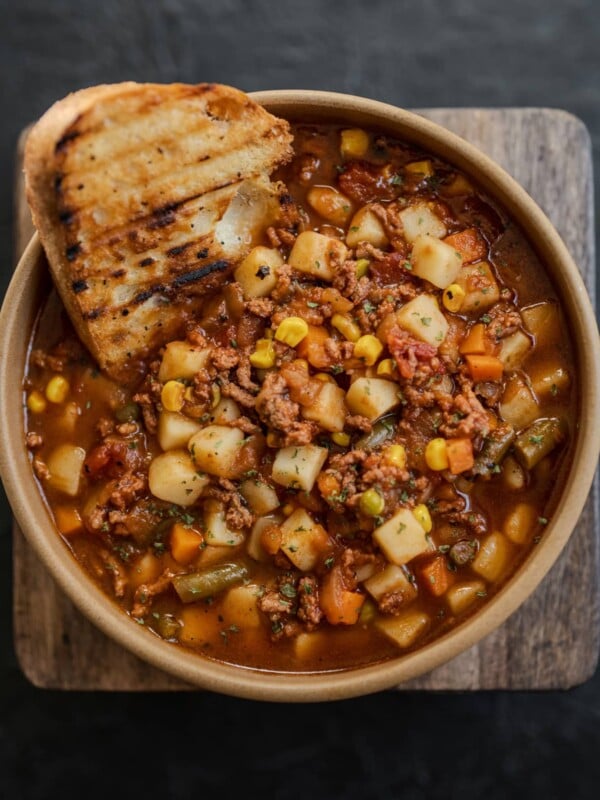
This recipe goes out to all my fellow minimal home cooks that don’t always feel like chopping vegetables. That’s right, this high protein chili requires no onion, garlic, or peppers, making it both easy and picky eater approved. Everything goes in a pot and you’re left with a delicious beaucoup of chili about 30 minutes later.
Every big ol’ serving is packed with 25 grams of protein, 8 grams of filling fiber, and just 235 calories. It’s perfect for meal prep, and I’ve included some recipe options for things like chili baked potatoes, loaded tots, and more!
High Protein Chili Recipe Walkthrough
It’s an easy recipe, but I’ll walk you through each step with photos below and give a few extra tips and tricks. If you’d like the skip down to the recipe card, there’s a jump to recipe button at the top of this post. You can always bounce back here if you need some help.
Make Homemade Chili Seasoning
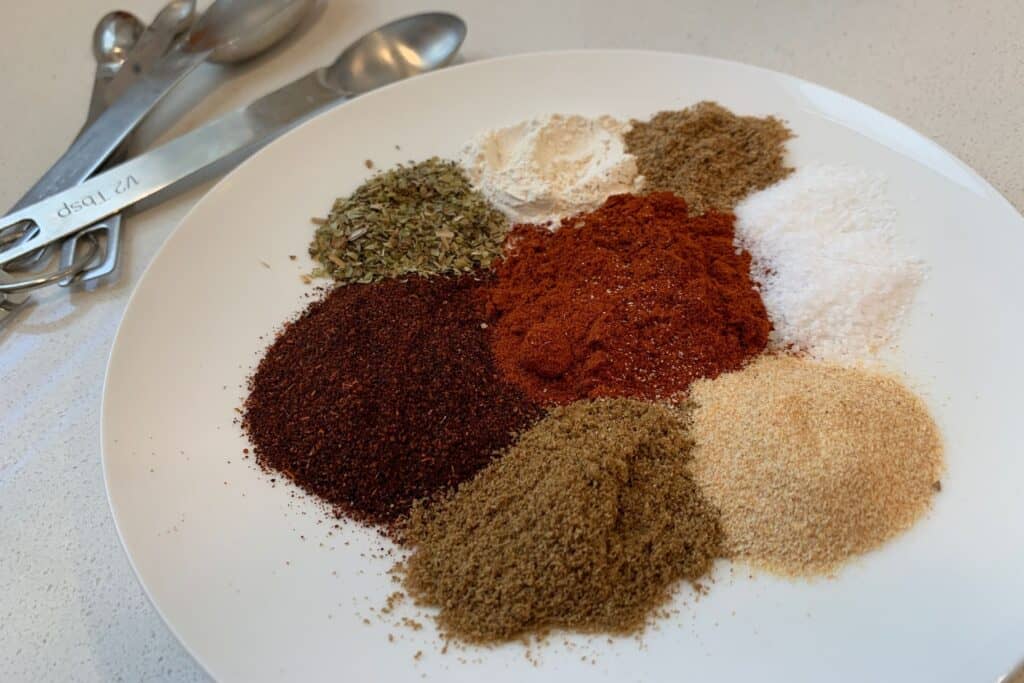
Being a kid friendly chili and a recipe for minimal cooks means no fresh veggies, so a homemade chili seasoning is vital for replacing all the flavor you traditionally get from ingredients like onion and garlic.
Here’s everything you’ll need to make your own chili seasoning:
- chili powder
- smoked paprika
- dried oregano
- cumin
- garlic powder
- onion powder
- ground coriander (optional)
You may see salt hanging around in the photo above, but I prefer to leave it out of chili seasoning to add at the end of cooking. Since different chili powders and beans may have different amounts of salt in them, it’s better to add as needed than over salt the chili.
Side note: If you have the time, make your own chili powder. It’s the bomb dot com.
How spicy is this high protein chili?
I used McCormick chili powder. Not every chili powder is created equally when it comes to the Scoville scale. It’d be impossible for us to compare every chili powder out there to know spice levels so just remember—adding acid from things like lime or fat free Greek yogurt help reduce the heat in a overly spicy dish.
On the flip side, if you like spicy chili, you’ll probably want to add some extra cayenne pepper or an even spicier dried chili powder for some extra heat.
Brown and fully cook two pounds of ground beef.
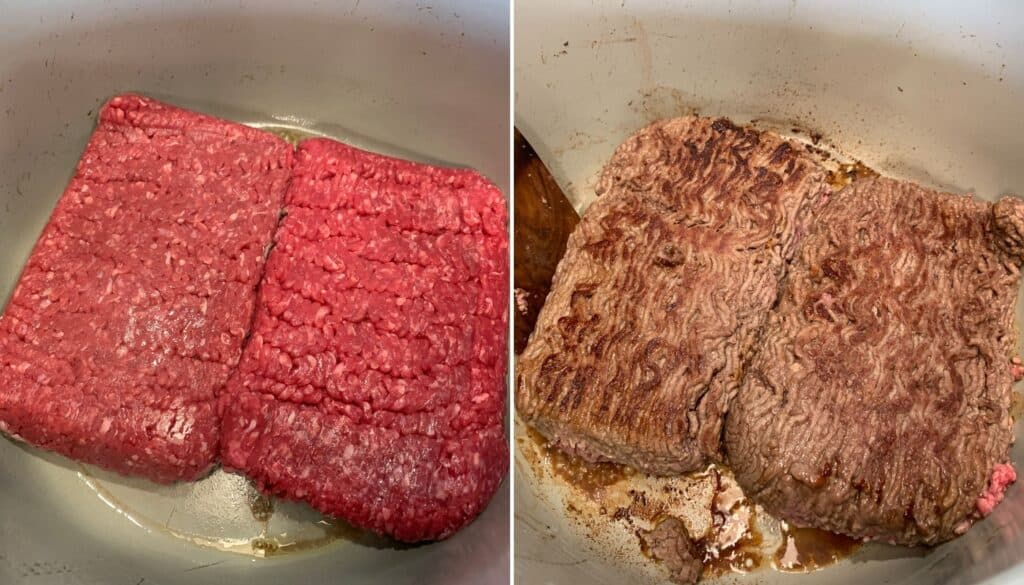
And I do mean brown the ground beef. If you’ve tried any of my healthy ground beef recipes, you know how passionate I am about browning ground beef. Let that meat get some color on it before mincing to finish cooking!
If you wanted to add fresh veggies like diced peppers or onion, do it after this step. Check out my Instant Pot Turkey Chili for an example.
Add the chili seasoning, tomato paste, and balsamic vinegar.
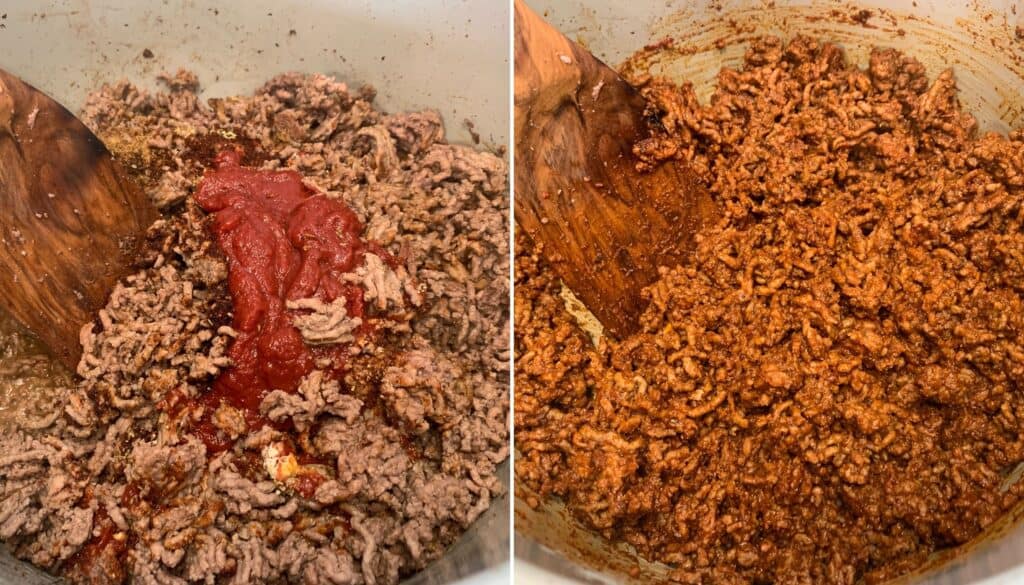
The balsamic vinegar, in combination with the tomato paste, provides some sweetness and tanginess that goes perfectly with the chili seasoning. If you don’t have balsamic vinegar on hand, another vinegar will get the job done. Or you could also try something like Worcestershire sauce or even a bit of hot sauce if you like a spicy chili. Think acidic and flavorful here.
Add black beans, pinto beans, red kidney beans, and beef broth to the ground beef.
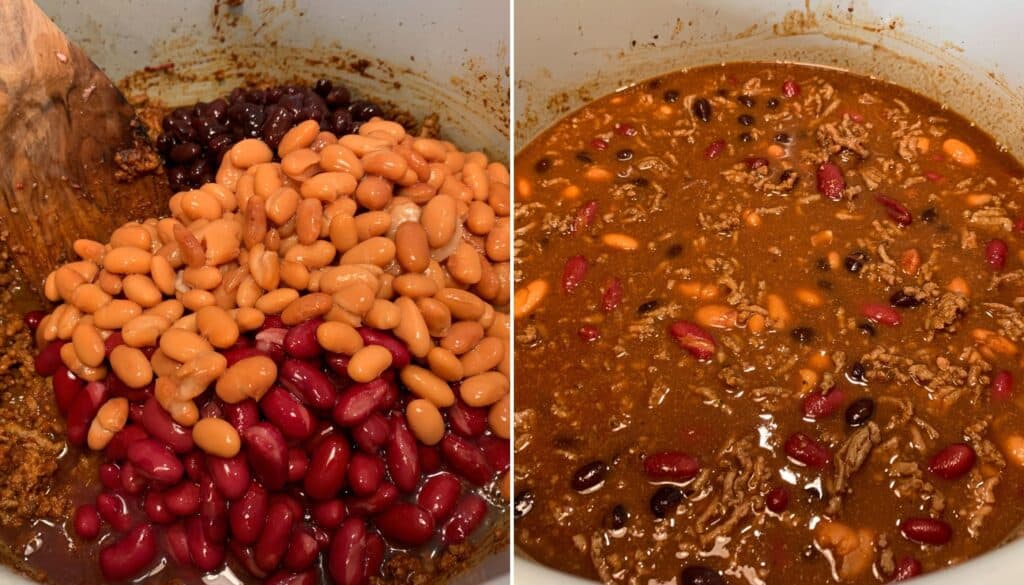
Feel free to any combination of beans in your high protein chili. You can’t go wrong here.
I mention in the recipe card that you can use more/less broth to get the chili to your desired consistency. The chili will thicken some once fully cooked so if it’s too thick for your liking with the two cups of broth, add an extra. You can always simmer a bit longer to thicken at the end.
Bonus ingredient note: If you’re not concerned about making kid friendly chili or appeasing picky eaters, you can always pack in some extra veggies at this step. Check out my high protein taco soup for an example of working broccoli and cauliflower into a dish you wouldn’t otherwise expect to have so many veggies.
Pressure Cooker Chili vs Stovetop Chili

I used a 6.5-quart Ninja Foodi to make pressure cooker chili, but a large pot over medium-high heat will get the job done just fine. By the time the pressure cooker comes up to pressure, the cook time between both methods is about the same. I do find, however, pressure cooking makes faster work of developing all the flavors.
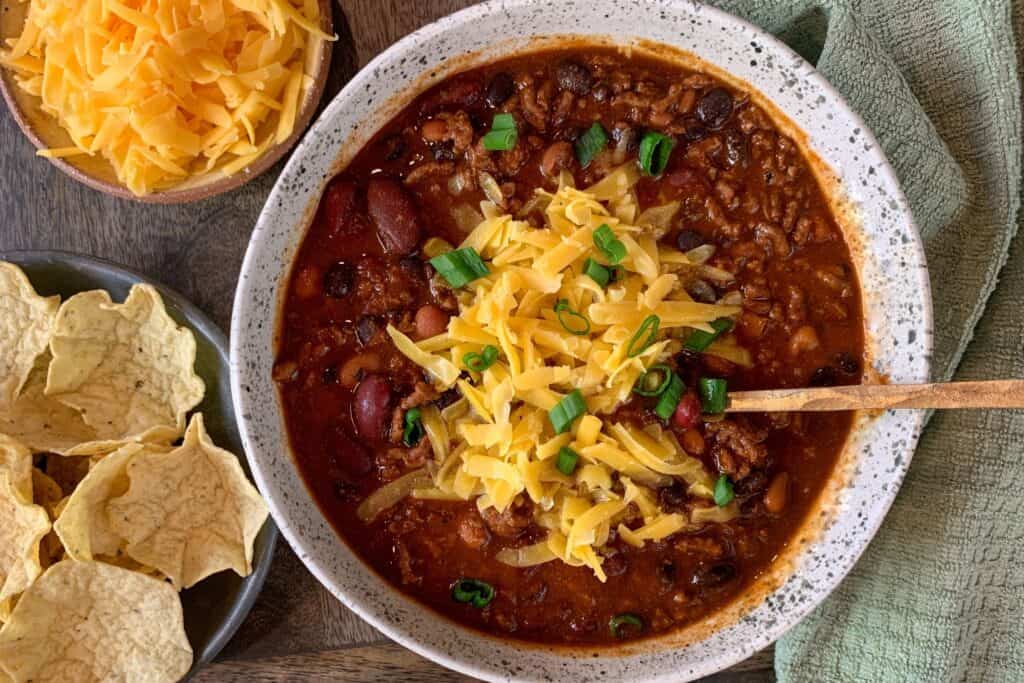
Serving Your High Protein Chili
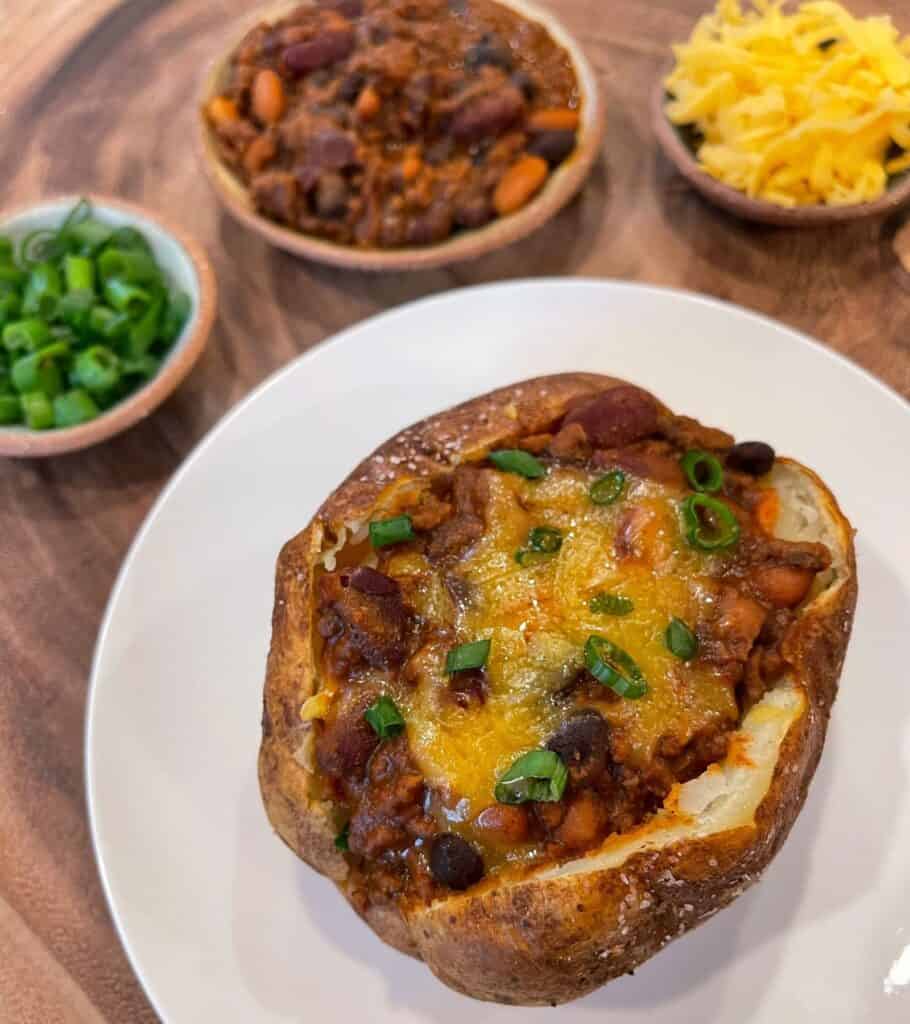
It’s never a bad idea to keep things simple. Take a minute to shred some fresh sharp cheddar, chop a little green onion, and serve with corn chips or baked tortilla chips for an easy approach to serving.
Though if you wanted to have some fun, you could stuff your high protein chili into something like my air fryer baked potatoes or leftover chili stuffed peppers. Or check out my easy turkey chili for tips on making homemade baked tortilla chips, chili cheese burritos, and chili mac.

However you end up serving your beef and bean chili, I’d love to hear about it. Let me know what you come up with or what you think about the recipe in the comments at the bottom of the post. I hope you enjoy!

Kid Friendly High Protein Chili
Ingredients
- 2 lbs Ground Beef, 96/4
- 3 Tbsp Chili Powder
- 1 Tbsp Smoked Paprika
- 1 Tbsp Dried Oregano
- 1 Tbsp Garlic Powder
- 1/2 Tbsp Onion Powder
- 1/2 Tbsp Cumin
- 1 tsp Ground Coriander
- 6 oz can Tomato Paste
- 2 Tbsp 30g Balsamic Vinegar*
- 15 oz can Black Beans
- 15 oz can Pinto Beans
- 15 oz can Kidney Beans
- 2 C Beef Broth**
Instructions
- In a large pot or pressure cooker, brown the ground beef on both sides before crumbling and cooking completely.
- Add the dry spices, tomato paste, and balsamic vinegar to the beef, stirring everything together before adding the beans (undrained) and broth.
- For pressure cooking, seal and cook with high pressure for 15 minutes. For stovetop, bring everything to a boil before reducing the heat to low and simmering, uncovered, for 20-30 minutes.
- Salt and pepper to taste. Serve with shredded cheddar, scallions or cilantro, Greek yogurt, and corn or tortilla chips.


I loved this chili recipe, and it was a total hit with the family! I made a couple of minor adjustments to suit our tastes: I skipped the cumin since my kid is really sensitive to any spice, and I used only two cans of baked beans to keep my husband happy (he’s super picky about beans). The baked beans added a subtle sweetness that we all enjoyed.
I have to admit, I was initially unsure about using only tomato paste instead of diced tomatoes, but it turned out better than I expected! The consistency was smooth, and the flavor was rich. Not having chopped onions was another bonus for my kiddo, and I was impressed that the garlic and onion powder kept the dish full of flavor without the chunks. This recipe is definitely going in my rotation!
Absolutely delicious and SO DANG SIMPLE. 4 year old son and 42 year old husband loved. Frozen leftovers and ate a few weeks later. Just as delicious.