This Ninja Foodi breakfast pizza pairs a low fat biscuit crust with creamy eggs, crispy bacon, and two types of cheese. It’s every bit as delicious and savory as it sounds, but it’s also on the healthier side. And the recipe includes tweaks to make it even healthier!
I’ll quickly walk you through the recipe below. And you’ll find a printable recipe card at the bottom of the post. If you’ve made any of my biscuit or pizza recipes before, you can probably skip right down to the recipe card.

Step 1: Make the biscuit pizza dough.
This biscuit pizza dough is a hybrid between my Greek yogurt biscuits and air fryer pizza. It’s slightly scaled down from the original biscuits recipe to fit the Ninja Foodi air fryer basket, and the butter in the dough has been omitted since there’s plenty of fat in the toppings. If you’ve made any of my pizza or biscuit recipes, this will be a walk in the park!
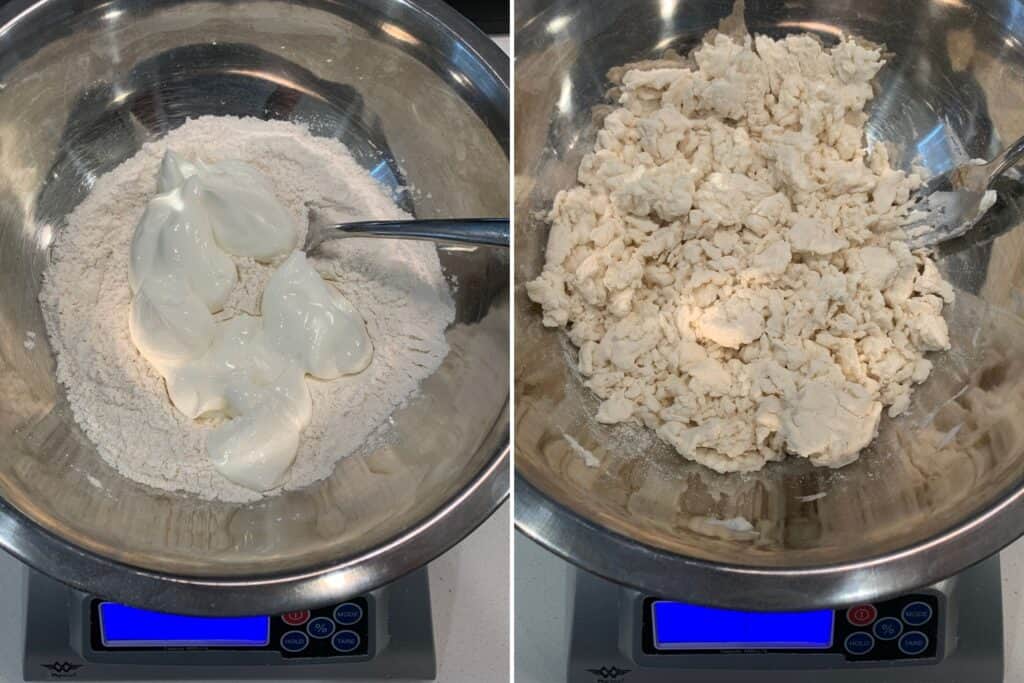
If not, it’s super easy to make. Just mix some all purpose flour with salt, baking powder, granulated sugar, and fat free Greek yogurt together until crumbly. Then throw everything on a flat surface and form a ball of dough to press into your pizza crust. I use a 6.5-quart Ninja Foodi, so an 8″ pizza dough fits perfectly.

The recipe calls for brushing the crust with skim milk, egg whites, butter, or more cooking spray. I tested all of them in the original biscuits recipe and found skim milk gives the best golden brown top out of the bunch.
Additional Tips for Making the Biscuit Dough
- Avoid over working the dough if you want it to rise. Unlike my cast iron pizza, which is meant to have a super thin crust, this breakfast pizza should have some height to it.
- Make sure your baking powder is fresh (<3 months since opening).
- Use a food scale to measure ingredients for best results.
You got this!
Step 2: Air fry the biscuit pizza dough before adding the toppings.
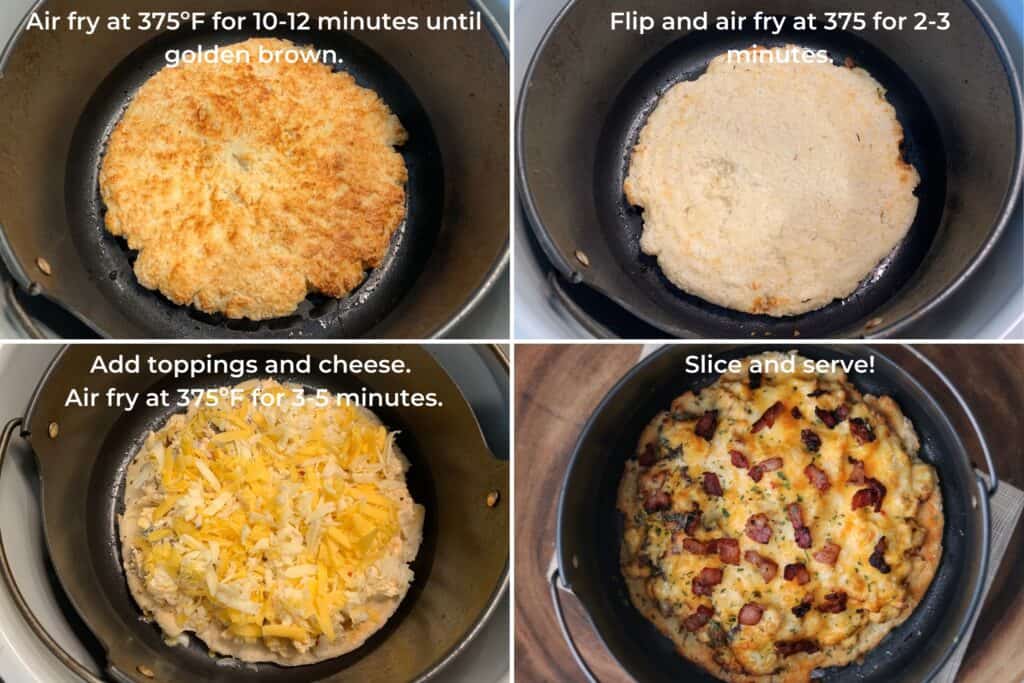
Air frying the crust on its own allows the crust enough time to rise and develop a golden brown, crispy exterior without burning the toppings. I’ll cover how to make the toppings and give a few alternatives below, but I’d like to first mention that using other air fryers may affect the cook time.
If you’re using a drastically different sized air fryer, you may want to scale the recipe up or down to make your pizza dough fit the basket a bit better. You can use the photos above as reference to know when to flip/add toppings.
Can I use an oven to make this breakfast pizza?
Yup! Place the crust directly on a baking sheet or pizza stone and follow the recipe as written. The original biscuits recipe takes around 20 minutes, and this breakfast pizza is smaller, so I’d guess the timing in the recipe is fairly close. And you may not need to flip the crust before adding the toppings since it’ll have direct contact with the baking sheet.
How to Make the Creamy Bacon and Eggs Topping
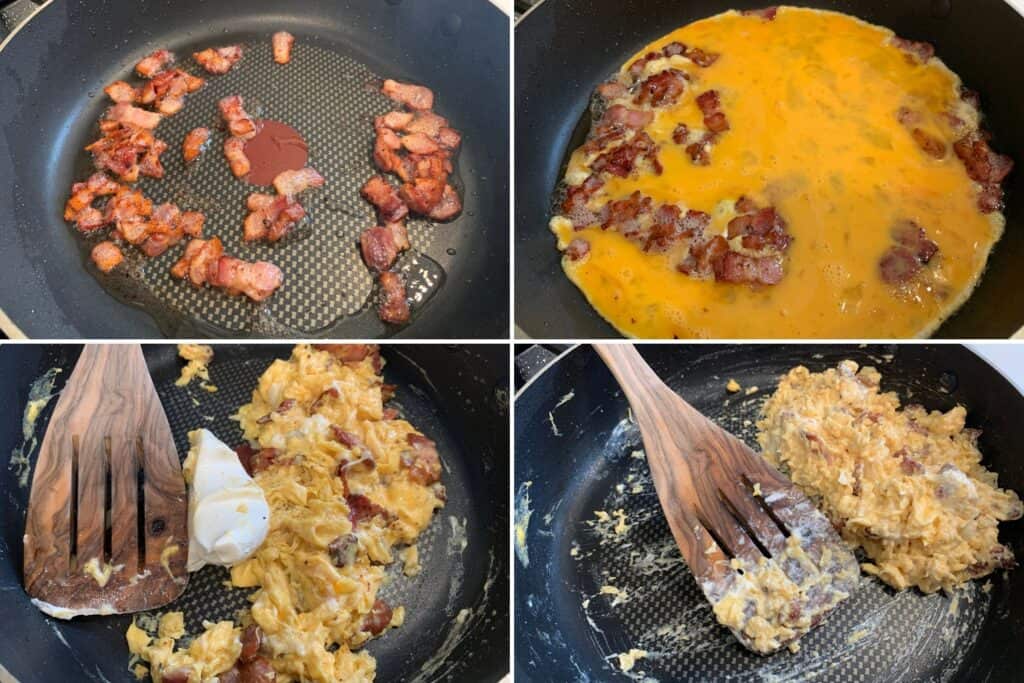
The recipe keeps it simple with bacon, eggs, and a little cream cheese. I’ve added notes on ways to reduce the fat content and change up the protein option in the recipe card below.
As far as notes for this step, I like to pre-cut my bacon before going in the pan. The bacon cooks faster and more evenly when pre-cut, and this eliminates the need for crumbling after cooking. You’re more than welcome to cook whole slices and crumble later, though!
One note I’ve added in the recipe card is that you can pull a few pieces of bacon out of the skillet before adding the eggs to use as toppings after air frying.

I think that covers it. If you have a recipe question I didn’t cover here or in the recipe card below, leave a comment at the bottom of the post. And if you love your Ninja Foodi breakfast pizza, I’d appreciate it if you left a recipe review!

Ninja Foodi Breakfast Pizza
Ingredients
For the Biscuit Pizza Dough
- 1 C 120g All Purpose Flour
- 1 Tbsp 12g Granulated Sugar (I used Swerve)
- 1 tsp Baking Powder
- 1/4 tsp Kosher Salt, or 1/8 tsp table salt
- 2/3 C 150g Fat Free Greek Yogurt
For the Toppings
- 4 slices Center Cut Bacon, cut into thin strips
- 4 large Eggs, beaten
- 2 oz Reduced Fat Cream Cheese, softened or room temp
- 2 oz Freshly Shredded Cheese, I used half cheddar, half pepper jack
Instructions
- Mix the flour, sugar, baking powder, and salt in a large bowl before adding the Greek yogurt. Use a fork to mix everything together until crumbly. Empty the beginnings of the dough onto a flat surface and use your hands to form a ball of dough.
- Use your knuckles to press outward from the center of the dough, creating thicker edges for the crust than in the center. The dough should be about 8" in diameter. You can also use a rolling pin here.
- Spray the air fryer basket with cooking spray before adding the crust. Brush the top with a splash of skim milk, egg whites, butter, or a bit more cooking spray.
- Air fry at 375ºF for 10 minutes before flipping and air frying an additional 3 minutes at 375ºF before adding the toppings.
- While the crust cooks, add the bacon strips to a nonstick skillet over medium-high heat. Once fully cooked, remove the skillet from the heat and add the eggs. Stir to scramble and add the cream cheese once the eggs are nearly cooked. Set aside. (Optional: set aside some of the cooked bacon pieces before adding the eggs to use as a topping when serving.)
- Add the bacon and eggs mixture to the crust. Top with the shredded cheese and air fry for an additional 3-5 minutes until the cheese is melted and bubbly. Let the pizza cool for a minute or two before carefully transferring out of the air fryer basket and slicing. Enjoy!
Notes
Toppings Notes
- To reduce the fat, you could use 3/4 C liquid egg whites instead of whole eggs, use fat free cream cheese, and/or cut the shredded cheese in half.
- You could also use other proteins like my chicken breakfast sausage or Ninja Foodi carnitas. Or you could go with store bought options like lower fat chicken bacon, turkey sausage crumbles, etc.


Love love this recipe!!! I’ve made it several times for brunch with friends.
This one of the best recipes I’ve made and I’ve tried a million of masons recipes!!! I’d definitely make this again!
Can you make this in an Oven
You can. There’s a section in the post with instructions for baking.
Thank you for the weight (gram) measurements